I recently added a couple new items to my product page at MyFlies.com, and I wanted to share these items with my readers. The items are Boxed Collector’s Sets of paired classic wet flies. The first to go up was the Silver Doctor and Golden Doctor, then a couple weeks later, this past weekend actually, the second set was posted – The Parmacheene Belle and the Trout Fin. All four are classic wet flies that were (or could also be) classic Lake Flies. In fact only the Trout Fin is not confirmed by my research as an authentic historic or heritage-style “Lake Fly,” but I believe that pattern, sent to Ray Bergman in the mid-1940’s by Bert Quimby of South Windham, Maine, for inclusion in Ray’s fourth book, With Fly, Plug, and Bait, 1947, is of Maine origin and was probably fished in lakes. So there you go. Classic logical conclusion arrived at by deduction of the facts.
These wet fly sets are actually what got me started on the path to being more or less a professional fly tier. I started selling them back in the mid-nineties when I was doing shows as an exhibitor; selling tying materials, flies, fly selections, hooks, tackle accessories, and – boxed pairs, sets of classic wet flies. Back then they were not even called “classic wet flies” because the term had not yet caught on, and I was about the only tier, or one of the few fly tiers around even tying those old “forgotten” brook trout patterns. It’s like at one time, Classic Rock music was just “rock music.” So these old “classic” wet flies were at one time, just “wet flies.”
I had sent the first set of the “Doctors” to a customer in Canada. Then I got another order just last week for a customer in Australia, which could be another story in and of itself, but suffice it to say that it’s amazing to think there are classic salmon and trout fly tiers in the land Down-Under. Bob Frandsen for one that I can think of; member of http://www.classicflytyingforum.com and TheStreamerList.com. (That reminds me of Men at Work, a favorite classic rock band from Australia. I love The Essential Men at Work, it’s one of my favorite CD’s).
So back to doctors in the house – the Silver Doctor was published in Favorite Flies and Their Histories, 1892, by Mary Orvis Marbury. Not once, not twice, but four times. The first Silver Doctor in Marbury’s book is among the Salmon Flies, then there are three different versions included on the Plates of Lake Flies, the Orvis version, and two more patterns of the Doctor, designed by Henry P. Wells, creator of the Parmacheene Belle, and J. G. Shearer. The Golden Doctor is not as well known as the Silver Doctor, but it is mentioned in Marbury’s book, dating it to the 19th century, certifying its probable use as a fancy Lake Fly pattern.
Here are some photos of the patterns:
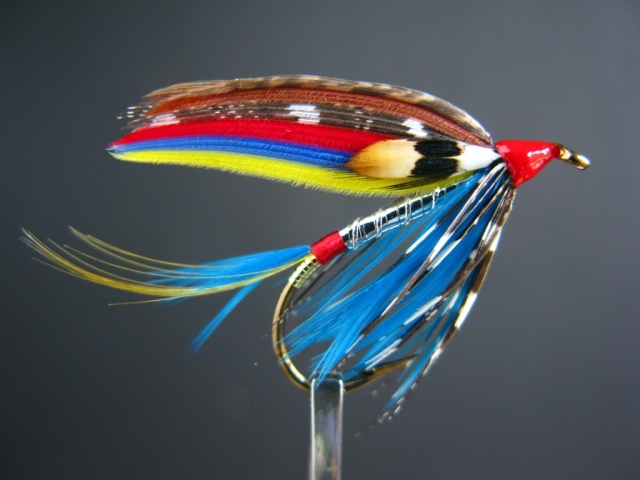
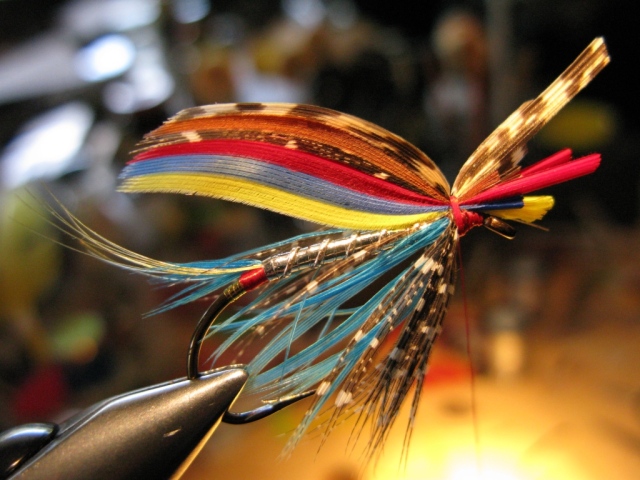
Silver Doctor – Don Bastian pattern variation. Dressed on a #4 Mustad 3906 vintage wet fly hook. I added the jungle cock cheek for extra appeal. The basic pattern – tail, tag, tip, body, hackles came from Trout, by Ray Bergman.
This pattern of the Silver Doctor is included in my second DVD, Advanced Classic Wet Flies, though that version has a slightly simpler five-strip wing. I got the idea for these original wing-quill versions of the Silver Doctor by examining commercially-tied Silver Doctor wet flies in The Maine Guide Fly Shop, in Greenville, Maine, about ten years ago. Those patterns were tied with duck wing quills, simply yellow and blue, married together. Up until then I had always tied the Silver Doctor using flank feathers of teal, barred wood duck in some cases, and mottled turkey or bustard, along with goose shoulder for the red, blue, and yellow. Seeing those simple quill-wing versions got me thinking; why not use more durable wing quill slips in place of the harder-to-use – not to mention grading and selecting – and less durable flank feathers? I used plain brown goose for turkey, and guinea fowl for a replacement for the black and white teal feathers. The rest was plain old goose and duck wing quill sections, readily available and easy to marry.
Here is the Golden Doctor:
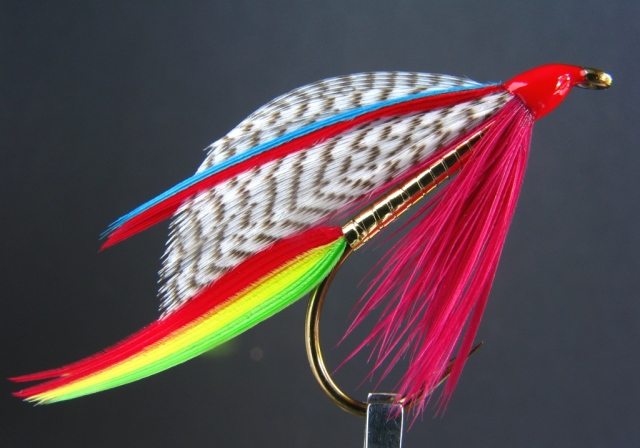
Golden Doctor – dressed and photographed by Don Bastian. The hook is a Mustad #4 vintage 3906. This pattern recipe is the one taken from Trout, 1938, by Ray Bergman.
Here is the link to this set of wet flies: http://www.myflies.com/Classic-Wet-Fly-Collection-Silver-and-Golden-Doctor-P837.aspx
When I was tying the Silver Doctor for the customer in Australia, I got the inspiration to change the mottled turkey in the wing to light and dark brown mottled peacock wing quill. The mottling of brown is bolder and more contrasting in the peacock feathers, and my reasoning was that it would look better. And I believe it does. All of these flies are tied with the wing tips curving downward, in popular 19th century fashion.
Here is the Silver Doctor, my latest variation:
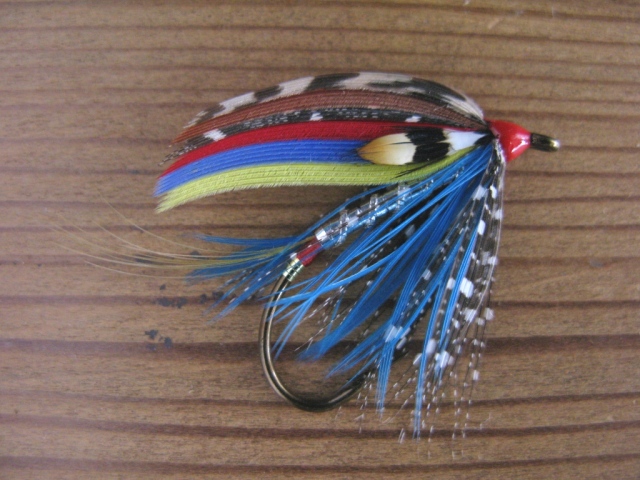
Silver Doctor – dressed and photographed by Don Bastian. This pattern also differs from the one above in the lack of a tip; both the flat gold tinsel and red floss are part of the tag on this version. Sorry the photo is a little lackluster; I’m still having to shoot on “auto” which severely limits my options for lighting, focus, color, and depth-of-field. I may still decide to change the plain brown-dyed goose to mottled brown turkey for a little more variegation of color.
The Golden Doctor:
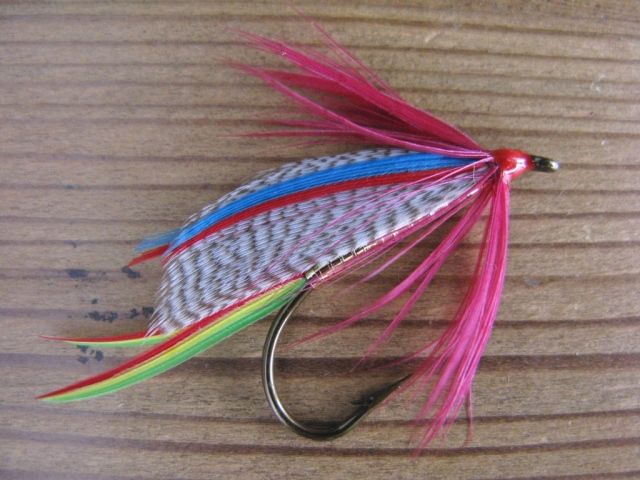
Golden Doctor – this version has a full collar hackle applied after the wing was mounted. These wing slips were cut from a matched pair of mallard flank feathers; that is a left and a right, so that the webbed fibers are balanced, left and right. Historically this pattern would have been tied with a pair of whole gray mallard flank feathers for the wing.
Golden Doctor
Thread: Danville Flymaster 6/0 #56 Red
Hook: #2 Mustad 3906, any standard wet fly hook will suffice
Tail: Red, yellow, and green goose or duck quill sections; married
Body: Flat gold tinsel
Hackle: Claret
Wing: Gray mallard with “splits” of narrow married blue and red goose shoulder
Head: Red – Wapsi lacquer was used over the red thread, and finished with a couple coats of clear Grif’s Thick
Below are both flies together on the wood:

Golden Doctor and Silver Doctor – size #2 Mustad wet fly hooks, vintage 3906. Tied and photographed by Don Bastian.
Here are the #2 Doctors, card-mounted, labeled, and ready to be sent off to Australia; thank you Brett!
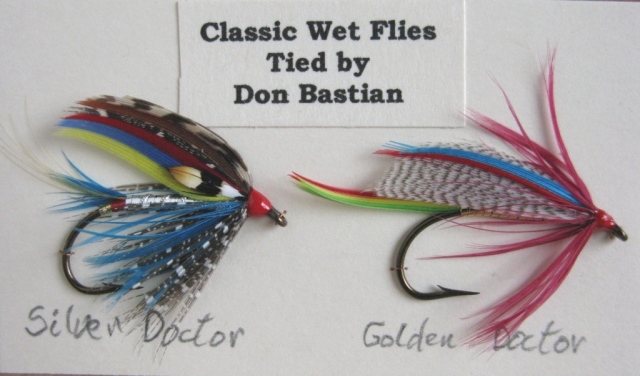
Silver Doctor and Golden Doctor – Mustad #2 vintage 3906 wet fly hooks. Tied and photographed by Don Bastian.
Silver Doctor
Thread: Danville Flymaster 6/0 #56 Red
Hook: Mustad 3906 wet fly hook, any standard wet fly hook will suffice
Tag: Flat gold tinsel
Tail: Golden pheasant crest and short dash of blue schlappen, or kingfisher
Tip: Red floss (see footnote differentiating tip and tag)
Ribbing: Oval silver tinsel
Body: Flat silver tinsel
Hackle: Blue fronted by guinea fowl
Wing: Brown turkey or mottled peacock, brown goose (or mottled turkey), guinea fowl, red, blue, yellow goose; married
Cheek: Jungle cock
Head: Red – this has a coat of Wapsi red lacquer, with a couple coats of clear Grif’s Thick over
The definition of tag and tip is as follows: A tag is always at the end of the body, but always behind and underneath the tail; whereas a tip is also at the end of the body but always encircles the tail. This definition is clear; taken from J. Edson Leonard’s 1950 book, Flies. However, in his own excellent Fly Nomenclature drawing, he contradicts himself by, according to his written definition, labeling part of the tag as the “tip.” The pattern in his diagram, p. 37, 1988 edition, actually has no tip. I believe my readers will appreciate this clarification.
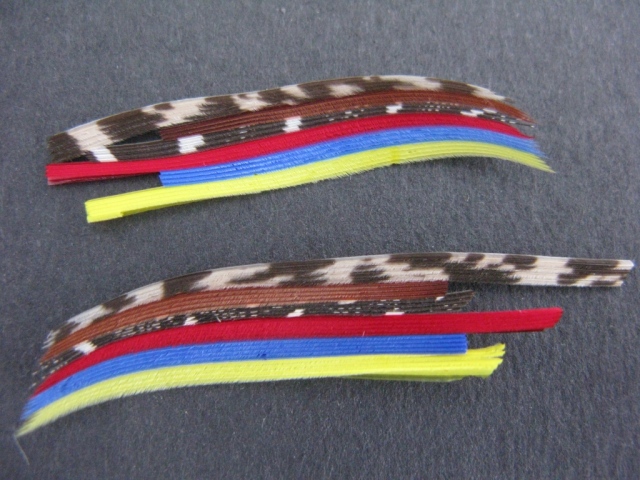
Here is a photo of the married wings before mounting; I didn’t count barbs, but figured four each was about right. The individual wings may be off a barb here and there. Two contradictory definitions can not both be correct.
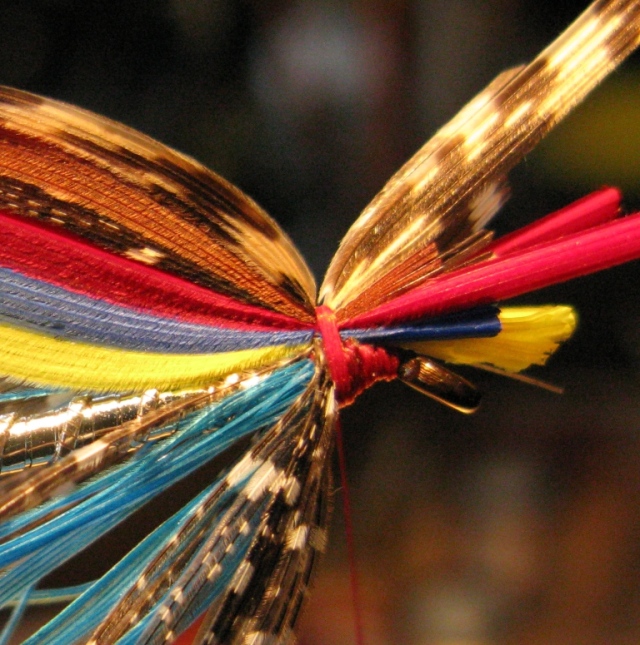
Macro-image of the wing set. Notice how the quill sections have compressed perfectly, and they are centered on top of the hook shank, with no fluting, pleating, or folds. Something I just learned how to do in March of 2012. Read below for that technique.
I shall endeavor to explain this as succinctly as possible. However, without a photographic step-by-step, or until I can make another video, this is the best I can do. If you don’t quite get it the first time, try reading it slower a second time, and go through the motions with your hands as you read. That should do it.
At the Annual L. L. Bean Spring Fly Fishing Expo in March of 2012, my friend from York, Maine, Dave Lomasney, showed me a “new” method of mounting wet fly wings. I had met Dave just one year earlier. Since he was interested, I spent some time teaching him the basics of tying wet flies and marrying wings. In a few months Dave was turning our great wet flies (see this post in my archives): http://donbastianwetflies.com/2012/01/02/bee-1900s-orvis-wet-fly-pattern/
In 2012 Dave came up to me as I was tying at Bean’s and announced he had discovered a new way to mount wet fly wings. I did not express too much amazement, because in typical “experienced” fly tier fashion, having tied wet flies for years, I figured there wasn’t much new under the sun. I was about to be enlightened! I’ve learned more than once not to be too stubborn and set in my ways. Most anyone who has tied a few flies can probably teach you something. Dave’s method has actually been around, but to my knowledge and surveys taken since, it was not normally used on feather wing wet flies. It may have been used by salmon fly tiers, but it was primarily developed to tie in bucktail hair wings, a small bunch at a time, the idea being to get a better grip on the hair fibers by tying in smaller bunches in stages. With bucktail, the tying thread is brought completely around the butt ends of hair, then around the hook shank, so two wraps are made over the butts before they are lashed down to the hook. So it is with the feather wing slips on wet flies.
Pinch and hold the wing in the usual position, but elevate it slightly above the hook shank as you make the first wrap, then the second thread wrap is brought underneath the butt ends of the quills, but not around the hook. Two wraps are made over the butt ends of the wing quills before you make the third wrap that takes the thread around the hook shank.
The two wraps over the wing must be made directly above the rear of the head, which is where your tie-in point would and should normally be. They must also be made in place, right on top of each other. Once the two wraps are made over the butt ends of the wing, let go of your bobbin. Then the left hand holds and only holds the wing proper (do NOT make any other motions); while the right hand grasps the butt ends of the wing and makes a slight up and down motion with the exposed butt ends. This action, combined with the gravity weight of the bobbin, relaxes and collapses the thread looped around the wing. Once this is accomplished, 50 to 75% of the wings butt ends will be compressed and collapsed down.
Next stabilize the wing with your left thumb and middle finger, holding the wing vertical, and tight (but not too tight to have the thread cut the fibers of the wing), and maybe even tilted slightly toward you; grasp your bobbin, and tighten the thread slowly, gradually bringing it to up to maximum tension, before making the third wrap. Make two more wraps at max tension, then check your wing attitude.
With practice this method will improve your wing setting by 100%. It may take a few flies and wings and some effort to get it down. And I have learned that it is particularly useful for wider wings on large hook sizes. This technique excels in setting perfect wings on #2 and #4 hooks. I use it all the way down to #8’s; on #10 and smaller it is not necessary. I dare say thank you Dave! I have used this method on virtually every size #8 and larger wet fly wing I have tied in the last year-and-a-half.
One result this method accomplishes is this: It gathers the bottom of the wing quill sections completely together, pulling them in place and centering them top-dead-center on the hook shank. It eliminates any slippage or “creep” of the bottom of the wings down over the sides of the fly body. And it virtually eliminates pleating and folding of the wing. It also ties in the wing at the exact point where the thread initially makes contact on the top of the quill sections, eliminating the forward thread-slippage that almost always occurs when setting wet fly wings with the conventional finger-pinch-wrap method. I still teach the conventional method of setting wings, but in every class I have taught since Dave showed me this trick, I teach this method more than any other. My students unanimously love it better than the old method.
Oh, and yes, I use the same method on the Golden Doctor and other flank-winged wet flies in setting the two opposing sections of gray mallard flank. Works like a charm!

Don, loved the blog today. These Doctor flies are killer.
Hey Kelly;
Thank you for your comment and appreciation! Glad you liked the “Doctors!”
Nice blog Don; so informative and the Silver Doctor (with eye) has to be one of the most attractive patterns I’ve seen you tie. I’m a sucker (like a few trout) for bright colors!
Terry
Hi Terry; Thanks again for your comment!
I’m happy to hear your positive feedback! Appreciate that you enjoyed my writing and information…and flies! I kinda like that Silver Doctor myself. 😉
It’s a fun pattern to tie; the wing is the thing!
Another installment in your continuing history + art series, DB. Beautiful work all around.
Hi Bill;
I’m pleased to hear your positive response, I appreciate it very much! Glad you like the combination of flies, info, and history. Thanks!
Nice job,Don.
Hi Dick;
Thank you very much! Great to hear from you! Looks like I’ll be visiting Wantastiquet in mid-October, looking forward to that. Thanks for your comment!
Hi Don,
Great looking Doctors!…the wing set looks perfect in the Macro image.
I’m glad to hear you are using the method and it is working. Like anything it takes a little practice,but the the end results are worth it..”Great wing sets”!
Dave
Hi Dave;
The man with the wing set plan! Thanks for your comments, glad you liked the flies. You’re right about the thread setting though, and I owe it all to you! Thanks buddy!
Tight threads!
Beautiful very very nice…..! hard work too…
Thank you Armando! Appreciate your compliments!